My Wedding Projects
Here are the things I'm hoping to make:
* Card Box
* Wedding Day Hoodie (Mrs. NewLastName)
* Candles and decor for Florida reception
* "We Do" letters for cake table
* Photo Sharing Cards
* OOT Bags
* Bar signs
PHOTO SHARING CARDS
We designed our photo sharing cards on Vistaprint using their free business card deal. They turned out pretty cute for the fact that we spent very little money. Photo will be posted soon.
"WE DO" CAKE TABLE LETTERS
I bought the four letters made of MDF at Michael's Crafts. They were $2 per letter, so much less expensive than the wood letters I had found. I spray painted them with metallic silver paint, and they look pretty good. I may embellish them with some rhinestones or something if I have time.
CANDLES AND FLORIDA RECEPTION DECOR
We just needed some decor items to keep the tables from looking too sparse at our party in Florida. I found sets of three cylinder vases in different sizes at Ikea ($12.99 per set), so I grabbed two sets and a package of floating candles (24 for $5.99). I also bought some silver and clear rocks to put in the bottom of the vases, and I may submerge flowers in the water below the floating candles. This was a much cheaper option than having the florist set up the same thing. I also bought some diamond confetti to sprinkle amidst the rose petals on the guest tables and cupcake display.
Card Box
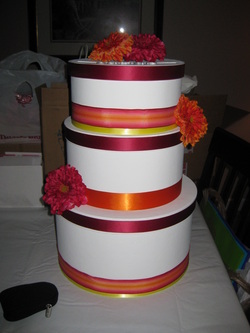
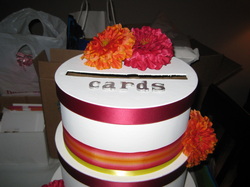
It's finished! I painted the boxes, cut and stacked them, and glued flowers to the top of the box. I added orange and pink ribbon around the layers and added two more flowers to the sides. After the wedding, I'll be pulling the ribbons and flowers off and letting my sister use it as her card box. She'll be adding teal and yellow ribbon and white flowers to go with her wedding colors.
Card Box Instructions
I used a 9-1/2" (#1), 10-1/4" (#2) and 12.75" (#3) round paper mache hat boxes from Hobby Lobby for the structure.
I then cut a 1" opening on the top of box #1 for the cards to drop through, and cut holes in the bottoms of boxes #1 and #2 and the tops of box #2 and #3, leaving a 1/2" lip on the bottoms of the boxes for the glue (so it wouldn't seep out the sides). We used a very sharp Fiskars craft knife that I purchased from JoAnn's.
I then painted all boxes with white acrylic craft paint using foam brushes and a small foam roller that I purchased from Walmart. The foam roller actually worked much better than the foam brushes because they left brush stroke marks in the paint where the roller did not.
I then stacked the boxes from largest to smallest and glued all of the boxes and box tops together using hot glue. I had to work very quickly with the hot glue because it started to harden while I was still applying glue around the bottoms of the boxes. After the hot glue dried, I went back through and applied another bead of hot glue on the inside of the boxes along the rim where the holes had been cut out and joined to the box tops, to ensure that everything was glued together tightly. I wound up not gluing the box tops to the box bases because I wanted it to be easy to pull apart. I don't think anyone at our reception will be trying to disassemble the box trying to get to the cards, so I'm not too worried about it.
I then wrapped ribbon around the boxes and box tops and cut them using sharp Fiskars fabric scissors so the edges wouldn't fray. I found the dark pink ribbon on the David's Bridal website to match the bridesmaids' dresses, and found the orange, yellow and pink/orange ribbon at Walmart. I glued the ribbons to the boxes, with seams in the back, with hot glue. I then added silk flowers in pink and orange to the top and sizes of the structure. Finally, I took small MDF letters spelling out "cards" that I found at Michael's and spray painted them metallic silver (to match our cake table "We Do" letters). I hot glued them to the top of the box, and we were finished!
Cost:
$1.95 - Paper mache letters, Michael's
$11.00 - Paper mache boxes, Hobby Lobby
$3.24 - Spray paint, Walmart
$2.47 - Acrylic paint, Walmart
$2.00 - Paint tray, Walmart
$0.97 - Foam paint roller, Walmart
$3.00 - Foam paint brushes, Michael's
$10.00 - Silk flowers, Walmart
$16.94 - Ribbon, www.DavidsBridal.com and Walmart
$5.25 - Fiskars craft knife, JoAnn's
TOTAL - $60.79
TOTAL + TAX - $65.04
I already owned the fabric scissors and I borrowed the hot glue and glue gun from a friend, so there was no extra cost there. You could definitely make this less expensively if you used less expensive silk flowers and cheaper ribbon ($12 of my ribbon cost was for 1 spool of David's Bridal ribbon, the rest was from Walmart at about $2-$3 per roll). This still saved me about $35 plus shipping because I didn't need to order one from an Etsy seller.
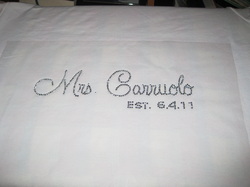
Wedding Day Hoodie
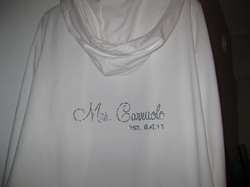
I finally decided to tackle my biggest DIY project, the NewMrsLastName Hoodie to wear on my wedding day! I found the instructions on EMarston's planning bio and couldn't resist trying it for myself. I admit that I was a little intimidated because I'm not very crafty and had no idea if I could pull this off, but I LOVE the result! I'm so glad I went for it. I bought a white zip-front hoodie and put rhinestones on it with my name and wedding date. You can do this on any fabric item that you choose (hoodie, underwear, tank top, etc.).
Hoodie Instructions

What you need:
* Flatback Hot Fix Rhinestones (I used 10ss 3mm purchased from eBay)
* Mylar Paper (also purchased from eBay)
* Angled craft tweezers
* Computer and printer
* Scotch tape
* Iron
* Hoodie
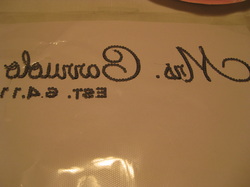
I started by typing out my New Name in Microsoft Word, and used the Word Art feature to add "Est. 6.4.11" beneath it. I used the Feel Script font in 150 pt for my name and Copperplate Gothic Light in 42 pt for the Est. date. Then, I clicked the Print option and clicked Properties. I went to the Advanced tab and turned "on" the Mirror Image. This makes the whole document print as a mirror image of itself (see left). Then, I used Scotch tape to tape the printed mirror image down on the table so it wouldn't move. I then cut a piece of mylar paper to size, peeled off the white backing and put it over the printed NewMrsLastName paper STICKY SIDE UP. Then I taped the mylar paper down to the work surface (table), over the printed paper. It's a NIGHTMARE if you don't tape everything down to the table before you get started.
* Flatback Hot Fix Rhinestones (I used 10ss 3mm purchased from eBay)
* Mylar Paper (also purchased from eBay)
* Angled craft tweezers
* Computer and printer
* Scotch tape
* Iron
* Hoodie
I started by typing out my New Name in Microsoft Word, and used the Word Art feature to add "Est. 6.4.11" beneath it. I used the Feel Script font in 150 pt for my name and Copperplate Gothic Light in 42 pt for the Est. date. Then, I clicked the Print option and clicked Properties. I went to the Advanced tab and turned "on" the Mirror Image. This makes the whole document print as a mirror image of itself (see left). Then, I used Scotch tape to tape the printed mirror image down on the table so it wouldn't move. I then cut a piece of mylar paper to size, peeled off the white backing and put it over the printed NewMrsLastName paper STICKY SIDE UP. Then I taped the mylar paper down to the work surface (table), over the printed paper. It's a NIGHTMARE if you don't tape everything down to the table before you get started.
Using craft tweezers, place rhinestones SHINY SIDE DOWN onto the sticky mylar paper, tracing the letters on the printed page. You should be looking at the glue side of the rhinestones as you are placing them over your design. When you flip the mylar paper over and put it over your hoodie, the shiny side of the rhinestones will be up.
After you are done tracing the letters on your printed page with rhinestones, place it SHINY, NON-STICKY SIDE UP over your hoodie. Make sure that rhinestones do not fall off the mylar paper when you do this! Be careful to put the design/mylar paper on the hoodie straight and even, because once the rhinestones are ironed on, there's no way ot fix it. Be careful to put the design BELOW the bottom of the hood (as it lays on you when you're wearing it). Take a thin cloth (I used a dish towel) and place it over the design/mylar paper. Using high heat and NO STEAM (both extremely important), place the iron over the design and cloth and apply pressure. This is melting the glue! Do this until the stones set, about 2 or 3 minutes). Flip the hoodie over and place the iron on the backside of the design (inside of the hoodie) and apply pressure. This will ensure that the glue has set.
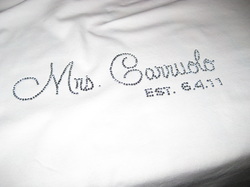
Slowly remove the mylar paper. Do it very slowly because some of the rhinestones may not have adhered to the hoodie and may need to be ironed a second time. This (to the left) is the finished design. While this was a very time consuming project, it was not necessarily hard and did not require me to be an expert in craft projects. In total, I spent around $35 on the items to make this hoodie. I got enough rhinestones and mylar paper to make more of these designs for my sister's wedding.
Program and Bubble Baskets
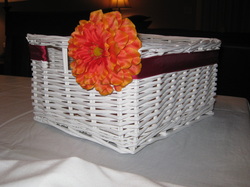
I finally finished my program and bubble baskets! I bought rectangular baskets at Ikea for $5.99 each, and added an extra coat of white spray paint to clean them up a little bit. Then I hot glued hot pink ribbon around the upper rim of the basket and added an orange flower so it would match several other DIY items. I'm very happy with how they turned out!
"We Do" Cake Table Decor
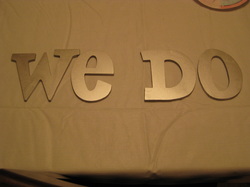
The lighting isn't very good in the picture, but I just took MDF letters spelling out "We Do" and spray painted them with metallic silver spray paint. I am still debating whether or not to add rhinestones to the edges.
